Basics of HTML
HTML: HTML is a Hyper Text Markup Language that defines the structure of your content. HTML consists of a series of elements, which you use to enclose, or wrap, different parts of the content to make it appear a certain way, or act a certain way.
HTML Element
The main parts of our element are as follows:
The opening tag: This consists of the name of the element (in this case, p), wrapped in opening and closing angle brackets. This states where the element begins or starts to take effect ,in this case where the paragraph begins.
The closing tag: This is the same as the opening tag, except that it includes a forward slash before the element name. This states where the element ends — in this case where the paragraph ends. Failing to add a closing tag is one of the standard beginner errors and can lead to strange results.
The content: This is the content of the element, which in this case, is just text.
The element: The opening tag, the closing tag, and the content together comprise the element.

Html Attributes
Attributes contain extra information about the element that you don’t want to appear in the actual content. Here, class is the attribute name and editor-note is the attribute value. The class attribute allows you to give the element a non-unique identifier that can be used to target it (and any other elements with the same class value) with style information and other things.
An attribute should always have the following:
-A space between it and the element name (or the previous attribute, if the element already has one or more attributes).
-The attribute name followed by an equal sign.
-The attribute value wrapped by opening and closing quotation marks.

You can put elements inside other elements too this is called nesting. If we wanted to state that our cat is very grumpy, we could wrap the word “very” in a <strong> element, which means that the word is to be strongly emphasized:
<p>My cat is<strong>very</strong>grumpy.</p>
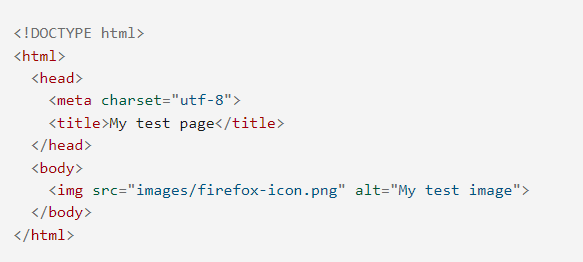
Basic HTML Document: Below mentioned are the basic HTML tags which divide the whole document into various parts like head, body etc.
· Every HTML document begins with a HTML document tag. Although this is not mandatory but it is a good convention to start the document with this below-mentioned tag. Please refer to the HTML Doctypes article for more information related to Doctypes.
<!DOCTYPE html>
· <html> : Every HTML code must be enclosed between basic HTML tags. It begins with <html> and ends with </html> tag.
· <head>: The head tag comes next which contains all the header information of the web page or documents like the title of the page and other miscellaneous information. This information is enclosed within the head tag which opens with <head> and ends with </head>. The contents will of this tag will be explained in the later sections of course.
· <title>: We can mention the title of a web page using the <title> tag. This is header information and hence is mentioned within the header tags. The tag begins with <title> and ends with </title>.
· <body>: Next step is the most important of all the tags we have learned so far. The body tag contains the actual body of the page which will be visible to all the users. This opens with <body> and ends with </body>. Every content enclosed within this tag will be shown on the web page be it writings or images or audios or videos or even links. We will see later in the section how using various tags we may insert mentioned contents into our web pages.

This section will cover some of the essential HTML elements you’ll use for marking up the text.
1. HTML Headings
Heading elements allow you to specify that certain parts of your content are headings or subheadings. In the same way that a book has the main title, chapter titles, and subtitles, an HTML document can too. HTML contains 6 heading levels, <h1>–<h6>, although you’ll commonly only use 3 to 4 at most:

2. HTML Images: The image tag is used to insert an image into our web page. The source of the image to be inserted is put inside the <img src=”source_of_image“> tag.

3.HTML Paragraph: These tags help us to write paragraph statements on a webpage. They start with the <p> tag and ends with </p>. Here the <br> tag is used to break line and acts as a carriage return. <br> is an empty tag.

4.HTML Lists
A lot of the web’s content is lists and HTML has special elements for these. Marking up lists always consists of at least 2 elements. The most common list types are ordered and unordered lists:
Unordered lists are for lists where the order of the items doesn’t matter, such as a shopping list. These are wrapped in a <ul> element.
Ordered lists are for lists where the order of the items does matter, such as a recipe. These are wrapped in an <ol> element. Each item inside the lists is put inside an <li> (list item) element.

5.HTML Links
Links are very important — they are what makes the web a web! To add a link, we need to use a simple element — <a> — “a” being the short form for “anchor”. To make text within your paragraph into a link, follow these steps:
-Choose some text. We chose the text “Mozilla Manifesto”.
-Wrap the text in an <a> element, as shown below:


